Keto Earthquake Cake: An Incredible Ultimate Recipe
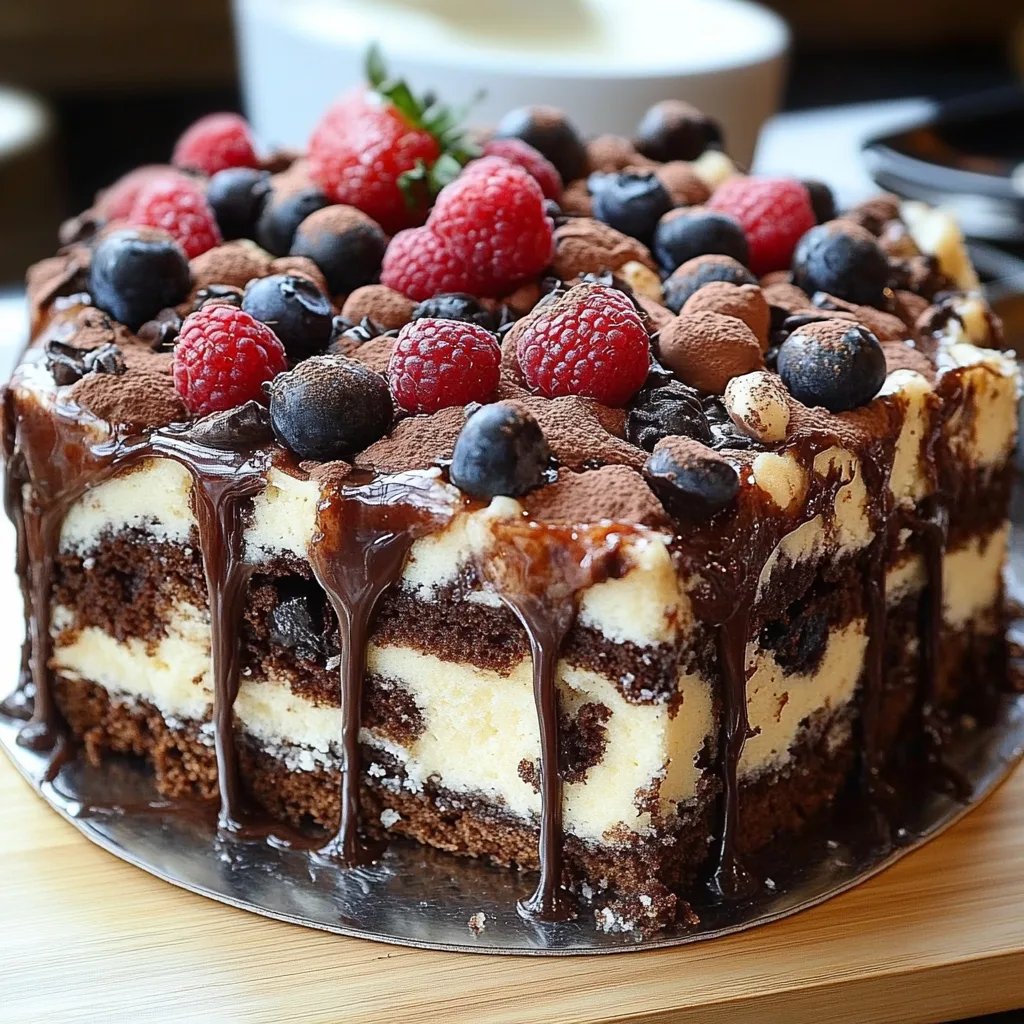
Keto Earthquake Cake is a delicious dessert that combines the rich flavors of chocolate and cream cheese, making it an amazing choice for anyone following a ketogenic diet. This delightful dish stands out for its unique combination of textures and flavors, leaving a lasting impression on those who taste it. The way the ingredients blend creates a cake that feels indulgent while still being low-carb. If you have a sweet tooth but want to keep your carbs in check, this cake might just be the answer.
Imagine a moist, chocolatey dessert where every bite is a perfect balance of sweetness and creaminess. The unexpected earthquake effect creates a delightful texture and presentation, making it perfect for gatherings or just when you need a treat. Keto Earthquake Cake is not just another low-carb recipe; it’s a celebration of flavors and textures that will leave you wanting more.
In this guide, you’ll uncover the secrets to making this incredible cake, explore why it’s a favorite among keto enthusiasts, and learn how to serve it perfectly. There’s a reason this cake has become one of the most sought-after desserts in the low-carb world, and we’re excited to share its secrets with you!
Why You’ll Love This Recipe
Keto Earthquake Cake combines amazing taste and texture that will captivate everyone. Here are a few reasons why this cake should be on your baking list:
- Satisfies Cravings – The rich chocolate and cream cheese filling combo is perfect for curbing sugary cravings.
- Easy to Make – With straightforward steps, even beginners can create this cake successfully.
- Low-Carb & Keto-Friendly – Enjoy a delicious dessert without worrying about your carb intake.
- Versatile Flavor – Feel free to customize with nuts or other keto-friendly add-ins based on your preferences.
- Eye-Catching Presentation – The unique appearance draws attention, making it a great centerpiece for any occasion.
- Perfect for Any Occasion – Whether it’s a birthday, family gathering, or just a treat, this cake fits every scenario.
These elements combined create an irresistible dessert that’s sure to impress your friends and family!
Preparation and Cooking Time
Creating the Keto Earthquake Cake requires time, but it’s well worth it for the delicious result. Here’s a breakdown of the cooking process:
- Preparation Time: 20 minutes
- Cooking Time: 35-40 minutes
- Cooling Time: 10-15 minutes
In total, you can expect to spend approximately 1 hour to bring this cake to life!
Ingredients
- 2 cups almond flour
- ½ cup unsweetened cocoa powder
- 1 ½ cups granulated erythritol or other keto sweetener
- 1 teaspoon baking powder
- ¼ teaspoon salt
- 4 large eggs
- ½ cup melted butter
- 1 teaspoon vanilla extract
- 8 oz cream cheese, softened
- ½ cup unsweetened whipped cream (optional)
- ½ cup sugar-free chocolate chips (optional)
- Pecans or walnuts, chopped (optional)
Step-by-Step Instructions
Creating a Keto Earthquake Cake is straightforward when you follow these steps:
- Preheat Oven: Preheat your oven to 350°F (175°C) and grease a 9×13-inch baking dish with cooking spray or butter.
- Mix Dry Ingredients: In a large bowl, whisk together the almond flour, cocoa powder, erythritol, baking powder, and salt until well combined.
- Combine Wet Ingredients: In a separate bowl, mix together the eggs, melted butter, and vanilla extract until smooth.
- Combine Mixtures: Gradually add the wet ingredients to the dry ingredients, stirring until completely combined.
- Prepare Cream Cheese Mixture: In another bowl, beat the softened cream cheese and erythritol until smooth and creamy.
- Layer Mixtures: Pour half of the batter into the greased baking dish. Spread the cream cheese mixture evenly on top, followed by the remaining batter.
- Add Toppings: Sprinkle the sugar-free chocolate chips and chopped nuts over the top for added flavor and texture.
- Bake: Place the dish in the preheated oven and bake for 35-40 minutes, or until a toothpick inserted in the center comes out clean.
- Cool: Remove from the oven and let the cake cool in the dish for 10-15 minutes before slicing.
- Serve: Cut into squares and enjoy your decadent Keto Earthquake Cake!
How to Serve
Serving Keto Earthquake Cake can be just as exciting as making it. Here are some ideas to elevate your presentation:
- Presentation: Use a decorative serving plate to display the cake beautifully. Ensure the squares are cut evenly for a professional look.
- Accompaniments: Consider serving with a dollop of unsweetened whipped cream or a scoop of sugar-free ice cream for an extra treat.
- Garnish: Add a sprinkle of cocoa powder or shaved sugar-free chocolate on top for a sophisticated touch.
- Beverage Pairing: This cake pairs wonderfully with coffee, tea, or even a glass of almond milk, enhancing the overall experience.
By focusing on the presentation and pairing of your Keto Earthquake Cake, you can create an irresistible dessert that will impress anyone lucky enough to indulge!
Additional Tips
- Use Quality Ingredients: Opt for high-quality cocoa powder and cream cheese. This will enhance the overall flavor and texture of your Keto Earthquake Cake.
- Ensure Proper Mixing: When combining the wet and dry ingredients, make sure to mix thoroughly. This ensures an even texture throughout the cake.
- Let It Cool Properly: Allow the cake to cool fully before slicing. This helps maintain its structure and prevents it from falling apart.
Recipe Variation
Feel free to explore and create your own iterations of the Keto Earthquake Cake! Here are a few variations to consider:
- Nut-Free Option: Omit the nuts entirely to cater to nut allergies or preferences. You can replace them with crushed keto-friendly cereal for added texture.
- Different Sweetener: If erythritol isn’t your preference, try using monk fruit sweetener or stevia for a different flavor and sweetness level.
- Chocolate Variations: Experiment with different types of cocoa powder, such as dark or Dutch-processed cocoa, for a richer chocolate flavor.
Freezing and Storage
Proper storage will ensure your Keto Earthquake Cake remains delicious for longer. Here’s how to do it:
- Storage: Store leftover cake in an airtight container in the refrigerator for up to 5 days. Ensure it’s well-covered to maintain moisture.
- Freezing: You can freeze slices of the cake for up to 3 months. Wrap each slice individually in plastic wrap and place them in a freezer-safe container to prevent freezer burn.
Special Equipment
To make the Keto Earthquake Cake successfully, you’ll need a few essential tools:
- Mixing Bowls: Having separate bowls for dry and wet ingredients makes the process smoother.
- Electric Mixer: This will help in achieving a smooth cream cheese mixture and properly combined batter.
- 9×13-Inch Baking Pan: Essential for baking the cake evenly.
- Measuring Cups and Spoons: Accurate measurements are crucial for this recipe.
Frequently Asked Questions
How do I know when the cake is done baking?
Insert a toothpick into the center of the cake. If it comes out clean or with a few moist crumbs, the cake is ready.
Can I make this cake ahead of time?
Yes, making the cake a day in advance is a great idea. It allows the flavors to meld beautifully.
Is this cake suitable for dietary restrictions?
Absolutely! You can modify the recipe with gluten-free flour to accommodate gluten sensitivities.
Can I reduce the sweetness?
Certainly! You can adjust the amount of sweetener to your taste preference, ensuring it isn’t overly sweet.
Conclusion
Keto Earthquake Cake is not just a dessert but an experience that satisfies cravings while being mindful of dietary needs. The combination of rich chocolatey goodness and creamy textures makes this cake exceptional. Perfect for any gathering or as a personal indulgence, it’s a dessert everyone can enjoy regardless of their dietary preferences. Best of all, with its easy preparation and exciting variations, you can continue to delight in new spins on this classic.